


-
Content Count
82 -
Joined
-
Last visited
-
Days Won
13
Content Type
Profiles
Forums
Calendar
Posts posted by Gregg
-
-
So plats have access to both shops...so Why are there the SAME ITEMS in 2 Different shops....
:CONFUSED:
Seriously, Be more creative when making these shops, i feel no thought has gone into these.
"plats can buy the same items as bronze donars but in noted form..."
Not unique at all, every new shop we get or any new thing thats added its all the same content, there are no new items or exclusive items for said donars to show off their appreciation for their contribution to the server.
Please Re-evaluate the store(s) and think more creativly when making these. theres 100s of items that are in runescape that just arent being used, yet you fill up both shops with the same items (For instance...Fighter Torso)-
.png) 2
2
-
 1
1
-
-
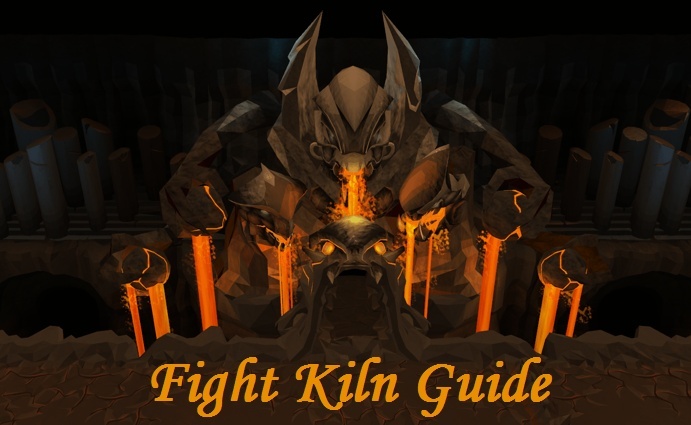
TokHaar-Hur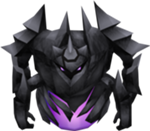
Combat Level
140Attack Style
MeleeListed Weakness
Magic > Easy to Soul Split or use blood spells on for healing.Extra Information
This is the weakest offensive monster in the Fight Kiln.
using Soul Split/Blood spells to heal off of them is suggested.
TokHaar-Ket-Dill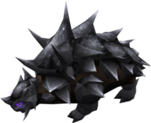
Combat Level
150Attack Style
MeleeListed Weakness
Magic - specifically Water SpellsExtra Information
This monster requires a pickaxe (Rune or Dragon) to defeat. The player must hit the Dill with the pickaxe until its armour shatters.
It is best to hit the Dill once and immediately move back into a safe-spot and await the Dill's Hp Bar to disappear before hitting it again; continue this process until the armour shatters.The Dill also has a stomp attack that cannot be defended against (it can even hit through the use of an Invulnerability Crystal). Using a prayer/curse near this monster while in combat could result in more frequent stomp attacks.
TokHaar-Xil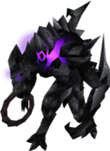
Combat Level
146Attack Style
RangeListed Weakness
Crush (pray range (if needed) unless there are mages attacking you as well)Extra Information
pray Accordingly if need be
TokHaar-Mej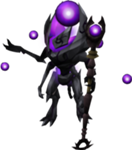
Combat Level
146Attack Style
Mage/MeleeListed Weakness
Range - specifically bolts. Make certain to remain out of melee distance.Extra Information
Though it's a mage-first monster, it's melee attack can hit quite well and though it is a magic-based creature, using magic attacks will work.
TokHaar-Ket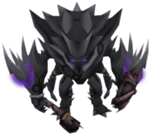
Combat Level
180Attack Style
MeleeListed Weakness
Magic - specifically Water spells.Extra Information
If needed, using Soul Split/Blood spells to heal off of them is suggested. Pray Melee if need be
TokHaar-Tok-Xil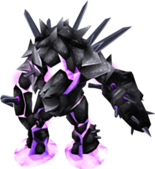
Combat Level
152Attack Style
Range/MeleeListed Weakness
Crush. Pray range and melee out. Quick kill.Extra Information
This is the only monster that is easier to kill with melee as opposed to using magic alone. Pray Range if need be
TokHaar-Yt-Mejkot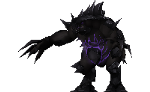
Combat Level
154Attack Style
MeleeSuggested Kill Method
Magic - specifically Water Spells.Extra Information
If needed, using Soul Split/Blood spells to heal off of them is suggested. Pray Melee if need be
TokHaar-Ket-Zek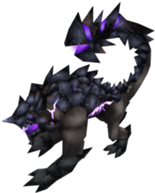
Combat Level
156Attack Style
Mage/MeleeSuggested Kill Method
Range - specifically bolts. (Ascension > Onyx (e) > Dragon (e)Extra Information
If a Ket-Zek is in a wave and is not able to be safe-spotted for any reason, Though it is a magic-based creature, using magic attacks works quite well. Pray Mage, Flick Between Soulsplit and Reflect Magic
TokHaar-Jad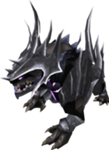
Combat Level
158Attack Style
Range/Mage/MeleeListed Weakness
None. Jad can be taken down with any combat form you prefer.Extra Information
Just like the Fight Caves Jad, it is possible to trap Tokhaar Jads behind the high rocks providing a moment to collect yourself, heal up, etc. For those who had a difficult time with the Fight Caves Jad, have no fear - Jads in the Fight kiln do not summon healers. It is simply a one-on-one match with each Jad. Only difference now is that you have to kill him five times throughout 36 waves to make it through to the boss for a chance at the Tokhaar-Kal.
Har-Aken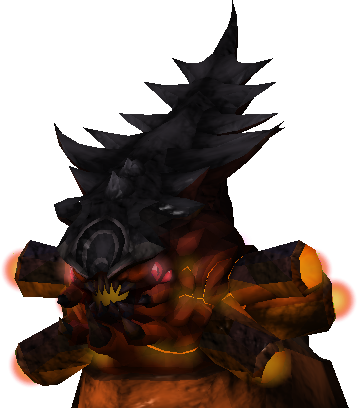
Combat Level
160Attack Style
Range/Mage/MeleeListed Weakness
Head - Magic.
Range Tentacles - Slash attacks.
Magic Tentacles - Thrown items.Extra Information
The head cannot damage you; it is what you are meant to attack in order to kill the boss. While you do not technically have to fight the tentacles, it does help to clear a corner out for you to reduce overall damage and is also a good opportunity to heal yourself through soul split or blood spells.
____________________________________________________________________________________________________________________________
Lava Crystals
Throughout the Fight Kiln, various crystals will appear in the center of the area which can aid you in various ways.
The following are the crystals and some information about them. Invulnerability Crystal
The Invulnerability Crystal will, as one may assume, make you invulnerable to all attacks for approximately fifteen seconds.
It is advised to collect all three of these.
These spawn upon completion of Waves 1, 13, and 25. Restoration Crystal
The Restoration Crystal will restore both Prayer and Life points back to their maxed state.
It is advised to collect all three of these.
These spawn upon completion of Waves 3, 15, and 27. Magic Crystal
The Magic Crystal boosts Magic by 50% for 3.5 minutes, however it greatly reduces Defense.
While not really a necessity for higher levels, one may hold onto a few for the boss fight.
These spawn upon completion of Waves 5, 17, and 29. Ranged Crystal
Like the Magic Crystal, the Ranged Crystal boosts Range by 50% for 3.5 minutes, however it greatly reduces Defense.
Not really a necessity for higher levels, though one may hold onto one for Wave 33(four TokHaar-Ket-Zek).
These spawn upon completion of Waves 7, 19, and 31. Strength Crystal
Like the two before it, the Strength Crystal boosts Strength by 50% for 3.5 minutes, however it greatly reduces Defense.
Not really a necessity for anyone with decent Fight Kiln melee stats/gear.
These spawn upon completion of Waves 9, 21, and 33. Constitution Crystal
The Constitution Crystal boosts one's max hit-point level to 50% above base level.
Using doses of Saradomin Brew or even the Unicorn Healing Scrolls will heal one's hp up to 50% higher.
It is advised to collect all three of these as they can be of great help during the Boss wave.
These spawn upon completion of Waves 11, 23, and 35.
____________________________________________________________________________________________________________________________
Step-By-Step Wave Instruction
Xil Attack
The first ten waves are mainly focused on Range-based attacks.
Range Protect/Deflect will be your main focus throughout these waves.
Melee will be your main form of attack with a fair bit of Range as well.Wave One
Monsters In Wave
Two TokHaar-Xil, One TokHaar-Tok-Xil, Two TokHaar-Hur
The red circle in the image above indicates where one should stand at the start of the wave.
The wall east of you is a high wall - nothing can range/mage over it.
It is advised to take no more than one step outside this spot to ensure the monsters behind the west wall cannot hit you.Completion of this wave provides you with your first crystal - an Invulnerability Crystal. It is advised to hold onto this for later use.
Wave TwoMonsters In Wave
Two TokHaar-Xil, Two TokHaar-Tok-Xil, One TokHaar-Hur
The red circle in the image above indicates where one should stand at the start of the wave.
The wall east of you is a high wall - nothing can range/mage over it.
It is advised to take no more than one step outside this spot to ensure the monsters behind the west wall cannot hit you.
Wave ThreeMonsters In Wave
One TokHaar-Xil, Three TokHaar-Tok-Xil, One TokHaar-Hur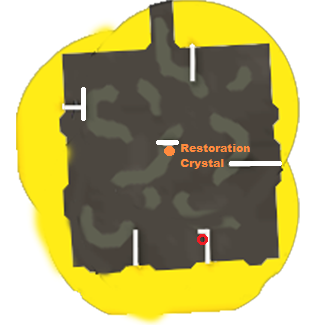
The red circle in the image above indicates where one should stand at the start of the wave.
The wall east of you is a high wall - nothing can range/mage over it.
It is advised to take no more than one step outside this spot to ensure the monsters behind the west wall cannot hit you.Completion of this wave provides you with your first Restoration Crystal. Advised to hold onto for later use.
Wave Four
Monsters In Wave
Three TokHaar-Tok-Xil, Two TokHaar-Mej
The red circle in the image above indicates where one should stand at the start of the wave.
The wall east of you is a high wall - nothing can range/mage over it.
It is advised to take no more than one step outside this spot to ensure the monsters behind the west wall cannot hit you.
Wave FiveMonsters In Wave
One TokHaar-Xil, Three TokHaar-Tok-Xil, One TokHaar-Ket-Dill
The red circle in the image above indicates where one should stand at the start of the wave.
The wall east of you is a high wall - nothing can range/mage over it.
It is advised to take no more than one step outside this spot to ensure the monsters behind the west wall cannot hit you.
This wave matches you up with your first Dill. One should only attack the Dill once all other monsters are down.
It is advised to use the south side of the center wall to trap and attack this monster.Completion of this wave provides you with a Magic Crystal. One may hold onto these, specifically for the boss fight.
Wave SixMonsters In Wave
One TokHaar-Xil, Three TokHaar-Tok-Xil, Two TokHaar-Mej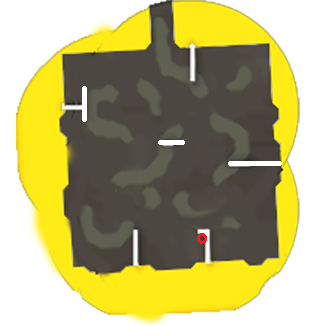
The red circle in the image above indicates where one should stand at the start of the wave.
The wall east of you is a high wall - nothing can range/mage over it.
It is advised to take no more than one step outside this spot to ensure the monsters behind the west wall cannot hit you.
Wave SevenMonsters In Wave
One TokHaar-Xil, Four TokHaar-Tok-Xil, One TokHaar-Mej
The red circle in the image above indicates where one should stand at the start of the wave.
The wall east of you is a high wall - nothing can range/mage over it.
It is advised to take no more than one step outside this spot to ensure the monsters behind the west wall cannot hit you.Completion of this wave provides you with a Range Crystal One may hold onto these, specifically for waves with Ket-Zeks.
Wave EightMonsters In Wave
Two TokHaar-Tok-Xil, One TokHaar-Ket-Zek (SE)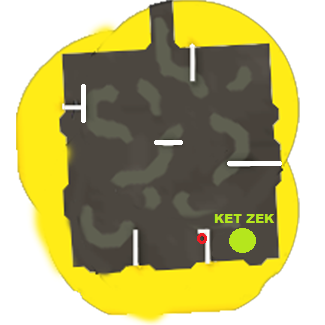
The red circle in the image above indicates where one should stand at the start of the wave.
The wall east of you is a high wall - nothing can range/mage over it.
It is advised to take no more than one step outside this spot to ensure the monsters behind the west wall cannot hit you.
This wave matches you up with your first Ket-Zek. Simple to range out while wearing gano + praying mage protect/deflect, this monster can be saved for last.
Wave NineMonsters In Wave
Six TokHaar-Tok-Xil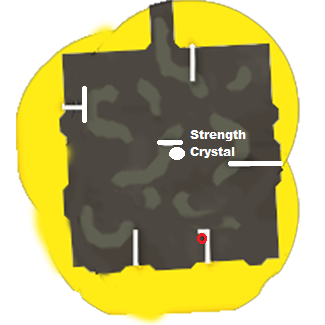
The red circle in the image above indicates where one should stand at the start of the wave.
The wall east of you is a high wall - nothing can range/mage over it.
It is advised to take no more than one step outside this spot to ensure the monsters behind the west wall cannot hit you.Completion of this wave provides you with a Strength Crystal. I don't really know of a reason to keep this crystal, however, one may do so if they wish.
Wave TenMonsters In Wave
One TokHaar-Tok-Xil, One TokHaar-Jad (SW)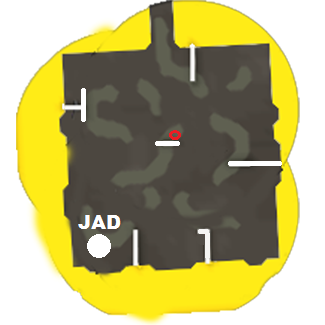
The red circle in the image above indicates where one should stand at the start of the wave.
Once the Tok-Xil steps into place at the rock, simply melee him out and quickly return to your starting position.
Now, it's just like Jad in the Fight Caves. Step out (make sure to be out of melee range) and switch prayers based on his attacks.
If needed, one can step back into starting position to collect or heal oneself.Upon completion of this wave, there will be a cut-scene to usher in the next set of waves.
Our Mej Wish To Test YouThe next ten waves are mainly focused on Mage-based attacks.
Mage Protect/Deflect will be your main focus throughout these waves.
Range will be your main form of attack with a bit of Melee as well.Wave Eleven
Monsters In Wave
Four TokHaar-Mej
The red circle in the image above indicates where one should stand at the start of the wave.
The wall east of you is a high wall - nothing can range/mage over it.
It is advised to take no more than one step outside this spot to ensure the monsters behind the west wall cannot hit you.Completion of this wave provides you with a Constitution Crystal. It is advised to hold onto these as they can be of tremendous help during the boss fight.
Wave TwelveMonsters In Wave
Two TokHaar-Tok-Xil, Two TokHaar-Mej
The red circle in the image above indicates where one should stand at the start of the wave.
The wall east of you is a high wall - nothing can range/mage over it.
It is advised to take no more than one step outside this spot to ensure the monsters behind the west wall cannot hit you.
Wave ThirteenMonsters In Wave
Two TokHaar-Mej, One TokHaar-Ket-Zek (SW)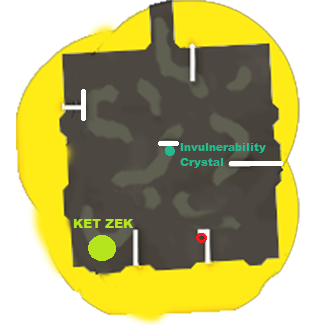
The red circle in the image above indicates where one should stand at the start of the wave.
The wall east of you is a high wall - nothing can range/mage over it.
It is advised to take no more than one step outside this spot to ensure the monsters behind the west wall cannot hit you.Completion of this wave provides you with your second Invulnerability Crystal. Again, it is advised to hold onto these for later use.
Wave FourteenMonsters In Wave
Two TokHaar-Mej, Two TokHaar-Ket-Zek (SE and SW)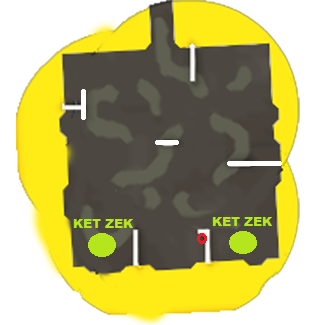
The red circle in the image above indicates where one should stand at the start of the wave.
The wall east of you is a high wall - nothing can range/mage over it.
It is advised to take no more than one step outside this spot to ensure the monsters behind the west wall cannot hit you.
Wave FifteenMonsters In Wave
One TokHaar-Tok-Xil, Two TokHaar-Ket-Zek (SE and SW)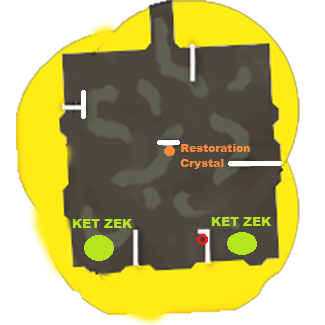
The red circle in the image above indicates where one should stand at the start of the wave.
The wall east of you is a high wall - nothing can range/mage over it.
It is advised to take no more than one step outside this spot to ensure the monsters behind the west wall cannot hit you.Completion of this wave provides you with your second Restoration Crystal. Again, it is advised to hold onto these for later use.
Wave SixteenMonsters In Wave
One TokHaar-Tok-Xil, Two TokHaar-Mej, Two TokHaar-Ket-Zek (SE and SW)
The red circle in the image above indicates where one should stand at the start of the wave.
The wall east of you is a high wall - nothing can range/mage over it.
It is advised to take no more than one step outside this spot to ensure the monsters behind the west wall cannot hit you.
Wave SeventeenMonsters In Wave
One TokHaar-Tok-Xil, One TokHaar-Mej, Two TokHaar-Ket-Zek (SE and SW), One TokHaar-Yt-MejKot
The red circle in the image above indicates where one should stand at the start of the wave.
The wall east of you is a high wall - nothing can range/mage over it.
It is advised to take no more than one step outside this spot to ensure the monsters behind the west wall cannot hit you.Completion of this wave provides you with your second Magic Crystal. Again, one may hold onto these specifically for the boss fight.
Wave EighteenMonsters In Wave
Two TokHaar-Tok-Xil, One TokHaar-Mej, Two TokHaar-Ket-Zek (SE and SW), One TokHaar-Yt-MejKot
The red circle in the image above indicates where one should stand at the start of the wave.
The wall east of you is a high wall - nothing can range/mage over it.
It is advised to take no more than one step outside this spot to ensure the monsters behind the west wall cannot hit you.
Wave NineteenMonsters In Wave
Eight TokHaar-Mej, One TokHaar-Ket-Dill
The red circle in the image above indicates where one should stand at the start of the wave.
The wall east of you is a high wall - nothing can range/mage over it.
It is advised to take no more than one step outside this spot to ensure the monsters behind the west wall cannot hit you.Completion of this wave provides you with your second Range Crystal. Again, one may hold onto these for use during waves containing Ket-Zeks.
Wave TwentyMonsters In Wave
One TokHaar-Ket-Zek (SE), One TokHaar-Jad (SW)
The red circle in the image above indicates where one should stand at the start of the wave.
Once both monsters take their places on the opposite side of the rock, you're free to take them out in the order of your choosing.Upon completion of this wave, there will be a cut-scene to usher in the next set of waves.
Out Ket Are ComingThe next ten waves are mainly focused on Melee-based attacks.
Mage Protect/Deflect will be your main focus throughout these waves.
Mage/Range will be your main forms of attack with a fair bit of Melee as well.Wave Twenty-One
Monsters In Wave
Twelve TokHaar-Hur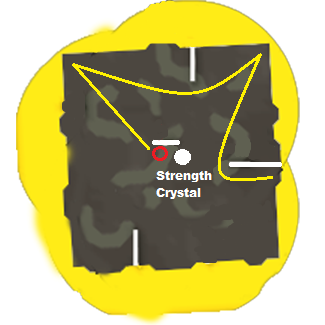
The red circle in the image above indicates where one should stand at the start of the wave.
After around three seconds, one should begin to follow the path outlined in yellow, effectively trapping all monsters on the opposite side of the Eastern Wall
It is now possible to safe-spot mage these off (perhaps using Soul Split or Blood spells to heal up if needed).Completion of this wave provides you with your second Strength Crystal. Again, I don't really know of a reason to keep this crystal, however, one may do so if they wish.
Wave Twenty-TwoMonsters In Wave
Two TokHaar-Hur, Two TokHaar-Ket, One TokHaar-Yt-MejKot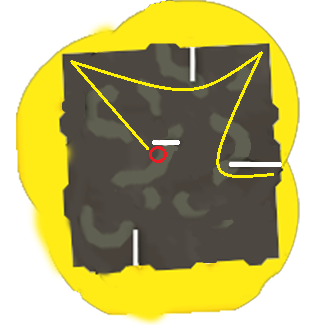
The red circle in the image above indicates where one should stand at the start of the wave.
After around three seconds, one should begin to follow the path outlined in yellow, effectively trapping all monsters on the opposite side of the Eastern wall
It is now possible to safe-spot mage these off (perhaps using Soul Split or Blood spells to heal up if needed).
Wave Twenty-ThreeMonsters In Wave
Two TokHaar-Hur, One TokHaar-Ket, Two TokHaar-Yt-MejKot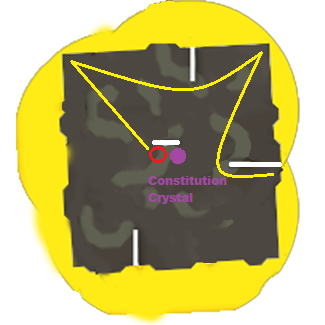
The red circle in the image above indicates where one should stand at the start of the wave.
After around three seconds, one should begin to follow the path outlined in yellow, effectively trapping all monsters on the opposite side of the Eastern wall
It is now possible to safe-spot mage these off (perhaps using Soul Split or Blood spells to heal up if needed).Completion of this wave provides you with your second Constitution Crystal. Again, it is advised to hold onto these as they can be of tremendous help during the boss fight.
Wave Twenty-FourMonsters In Wave
One TokHaar-Tok-Xil, Four TokHaar-Yt-MejKot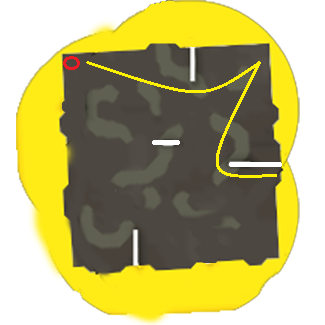
The red circle in the image above indicates where one should stand at the start of the wave.
Simply melee-out the ranger, then follow the path outlined in yellow, effectively trapping all monsters on the opposite side of the Eastern wall
It is now possible to safe-spot mage these off (perhaps using Soul Split or Blood spells to heal up if needed).
Wave Twenty-FiveMonsters In Wave
Two TokHaar-Tok-Xil, One TokHaar-Ket-Zek (SE), Two TokHaar-Yt-MejKot
The red circle in the image above indicates where one should stand at the start of the wave.
Melee out the first ranger, then follow the path outlined in yellow back to the north side of the center wall.Completion of this wave provides you with your final Invulnerability Crystal. Again, it is advised to hold onto these for later use.
Wave Twenty-SixMonsters In Wave
One TokHaar-Tok-Xil, Two TokHaar-Ket-Zek (NE and SE), Two TokHaar-Yt-MejKot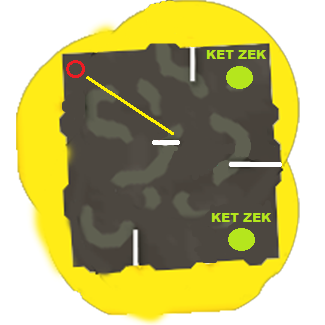
The red circle in the image above indicates where one should stand at the start of the wave.
Melee out the first ranger, then follow the path outlined in yellow back to the north side of the center wall.
From this point on, you should be able to finish off the wave with only one monster attacking you at a time.
Wave Twenty-SevenMonsters In Wave
One TokHaar-Tok-Xil, Two TokHaar-Ket, Two TokHaar-Yt-MejKot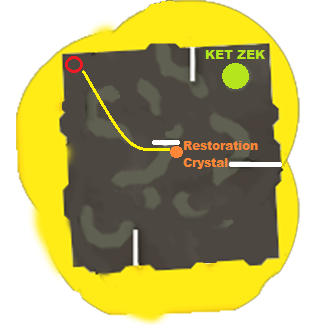
The red circle in the image above indicates where one should stand at the start of the wave.
Melee out the first ranger, then follow the path outlined in yellow to the south side of the center wall.
This should trap the Ket-Zek as well as the meleers, thus, one can simply mage out the melees, then range out the Ket-Zek.Completion of this wave provides you with your final Restoration Crystal. Again, it is advised to hold onto these for later use.
Wave Twenty-EightMonsters In Wave
Six TokHaar-Ket-Dill, One TokHaar-Ket-Zek (NW)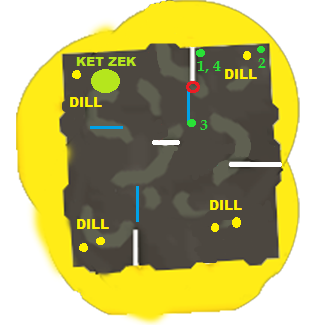
The red circle in the image above indicates where one could stand at the start of the wave.
The blue lines are the invisible beginning/ending grounds for each Dill.
The green lines are the route you will take to begin the wave (will be explained below).For example: If you're standing on the west side of the east blue line, the NE Dill will not attack you, however, you're now in the territory of the NW Dill.
At the beginning of the wave, turn Mage Protect/Deflect on and stand at the indicated space in the image above.
1) Wait until the NE Dill attacks you, then run north (on the east side of the rock wall) - this may or may not trap the Dill on the wall's edge.
2) From there, run to the NE corner (this will bring the Ket-Zek closer to where you will end up).
3) Then run SW as indicated in the image above and wait for the NE Dill to attack you.
4) Now, return to the northernmost space on the east side of the rock - the Dill should be trapped and the Ket-Zek within ranging distance.Once you take out the Ket-Zek, your prayer can be turned off and now begins the tedious process of taking out the Dills.
To try and keep minimal the damage one will take from these monsters, the trick is to hit them once with a pickaxe, then immediately step away.
Once the hp bar has gone, do the same thing - continuous process until the armour shatters.
*If your familiar attacks and keeps the hp bar active; simply wait ~4 seconds from your last attack and strike it again*Next comes the NW Dill. The NE blue line indicates the territorial line for the NE and NW Dills.
You want to cross the blue line (stand on the west side of it) to attract the attention of the NW Dill.
Once he gets close enough to you, step back behind it. Once he's close enough - strike him with a pickaxe and step back.
Again, continue the process until the armour shatters and take him out.Same for the final two sets of Dills. The W blue line is the territorial line for the SW Dills. Do the same as above.
Finally comes the SE Dills. The SW blue line is the same for them as the blue lines were for the others.
Follow the same process until the wave is complete.*Titan & Pack-yaks attacks CAN be used to hit through the armour of Dills*
Thanks Vise for letting me know of yaks, did not know.
Wave Twenty-NineMonsters In Wave
Six TokHaar-Yt-MejKot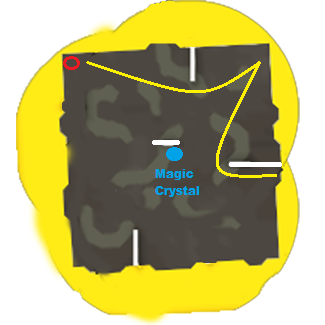
The red circle in the image above indicates where one should stand at the start of the wave.
From there, follow the path outlined in yellow to trap all six monsters behind the wall.
Use this time to Soul Split/Blood spell heal if needed, otherwise they're easy targets to mage out.Completion of this wave provides you with your final Magic Crystal. Again, one may hold onto these specifically for the boss fight.
Wave ThirtyMonsters In Wave
One TokHaar-Jad (SW), Three TokHaar-Yt-MejKot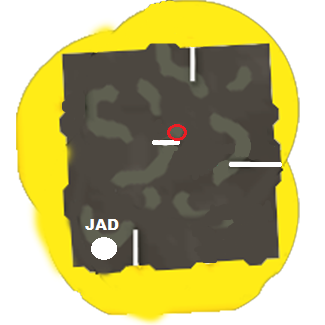
The red circle in the image above indicates where one should stand at the start of the wave.
Use Melee-Protect/Deflect or Soul Split to mage out the NE + NW monsters.
Now take out Jad, leaving the final melee to allow for a bit of Soul Split/Blood spell healing after.Upon completion of this wave, there will be a cut-scene to usher in the next set of waves.
Kill My Brothers Before The Lava Consumes YouThe next three waves each focus on one specific attack style.
31 - Range
32 - Melee
33 - MageWave Thirty-One
Monsters In Wave
Four TokHaar-Tok-Xil
The red circles in the image above indicate where one could stand at the start of the wave.
Simply Protect/Deflect Range and kill them off one at a time.Completion of this wave provides you with your final Range Crystal Again, one may hold onto these for use during waves containing Ket-Zeks.
Wave Thirty-TwoMonsters In Wave
Four TokHaar-Yt-MejKot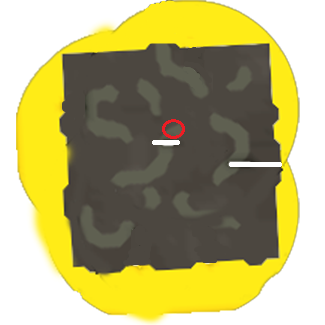
The red circle in the image above indicates where one could stand at the start of the wave.
Protect/Deflect Melee/Soul Split and mage them off one at a time.
Wave Thirty-ThreeMonsters In Wave
Four TokHaar-Ket-Zek
(Good wave to make use of a Range Crystal)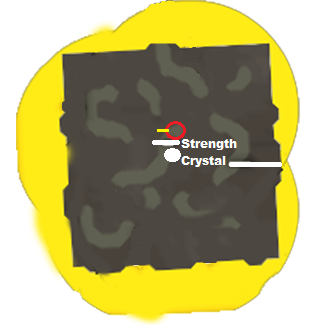
The red circle in the image above indicates where one could stand at the start of the wave.
Once the southern Ket-Zeks are trapped behind the center wall, move one space east, then run one space west of your starting position.
You should now be able to range the NW Ket-Zek while still having trapped the two southern ones.
Once the NW Zek is gone, you should have only one attacking you at a time from here on out.
Move north a bit and range out the NE Ket-Zek. Then take out the SE and finally the SW.Completion of this wave provides you with your final Strength Crystal. Again, I don't really know of a reason to keep this crystal, however, one may do so if they wish.
Upon completion of this wave, there will be a cut-scene to usher in the next set of waves.
We Remember Their ShapesThe final three waves prepare you for some good fashioned tactic fighting, all three of which include at least one TokHaar-Jad.
Wave Thirty-Four
Monsters In Wave
One TokHaar-Tok-Xil, One TokHaar-Jad (SE), One TokHaar-Yt-Mej-Kot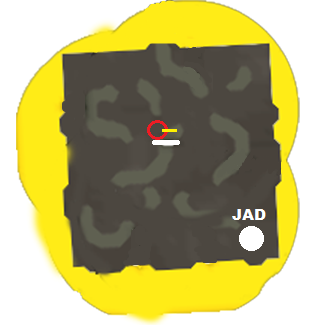
The red circle in the image above indicates where one should stand at the start of the wave.
Once the Jad is trapped behind the rock, move one space east, forcing the ranger to move north.
Take out the meleer followed by the ranger. Now it's just you and Jad again.
Wave Thirty-FiveMonsters In Wave
One TokHaar-Tok-Xil, One TokHaar-Ket-Zek (SE), One TokHaar-Jad (NE), One TokHaar-Yt-MejKot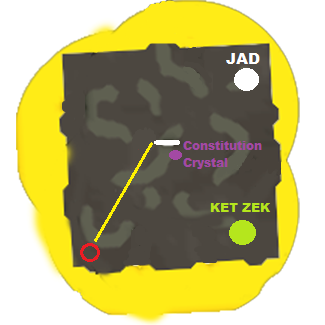
The red circle in the image above indicates where one should stand at the start of the wave.
Right before the wave starts, use an Invulnerability Crystal and take out the ranger as quickly as possible.
Once the ranger is down, follow the path outlined in yellow to the space west of the center rock and take out the meleer.
Once the meleer is down, put on your range set-up, take ONE step straight west, and long-range the Ket-Zek.
Once the Ket-Zek is down, it's you and Jad once more.There are technically three other ways of doing this wave as outlined in the video below
SPOILER:
Completion of this wave provides you with your final Constitution Crystal. Again, it is advised to hold onto these as they can be of tremendous help during the boss fight.
Wave Thirty-SixMonsters In Wave
Two TokHaar-Jad (SW and SE)
The red circle in the image above indicates where one should stand at the start of the wave.
Once both Jads take their respective positions on the south side of the center wall, simple take take one out, then the other.Upon completion of this wave, there will be a cut-scene to usher in the final wave.
One Final ChallengeThis is the wave you've been waiting for - the Boss wave
Clawing your way through tentacle after tentacle of which use mage and range (melee if you're within distance).
Can you endure this chaotic mass of attacks and leave victorious?
(Using a Magic Crystal at the start of this wave can be of tremendous help)Wave Thirty-Seven
Monsters In Wave
One Har-Aken, Many Range-Tentacles, Many Mage-Tentacles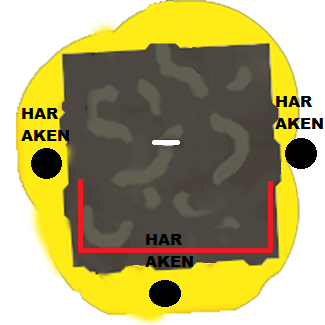
The best place to remain on this wave is along the wall (specifically the area outlined in red). You want to try and find a corner with as few tentacles as possible.
While one need not attack the tentacles, it does pass the time and allow for one to carve out a corner where they're free of attacks.
You want to range the Magic tentacles and melee the Range tentacles.
Once Har-Aken (the head) pops up, switch over to your mage offense (perhaps activate a magic crystal if you wish) and begin the attack process.NOTE - Har-Aken will NEVER spawn north.
Har-Aken will pop up approximately every 45-75 seconds so be on the move to make sure you don't miss him.
One lost opportunity could be the difference between dying right at the finish and coming out victorious.
its suggested to stand in the center on on the south wall and take 2 steps forward to be in its draw distance and run back and forth to find out Har-aken's spawning as his
locations are random, there is no set pattern.
____________________________________________________________________________________________________________________________
Rewards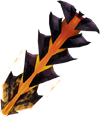 TokHaar-Kal-Ket (Melee Cape)
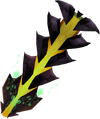 TokHaar-Kal-Xil (Ranged Cape)
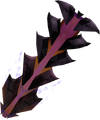 TokHaar-Kal-Mej (Magic Cape)
____________________________________________________________________________________________________________________________
Credits:https://www.tip.it/runescape/
http://runescape.wikia.com/wiki/
http://runescape.com-
6
-
-
1: Corrupted Defender

1. In order to start upgrading to the higher tier defenders, you MUST have a Dragon defender first. This can be obtained the same way as in either RS3 or OSRS.
2. Once you have your Dragon defender, head to Barrows (Quest Tab > Minigame teleports)
3. KEEP YOUR DRAGON DEFENDER EQUIPPED OR IN YOUR INVENTORY (You can't receive the upgrade piece without it!)
4. Keep doing barrows until you receive a Corruption sigil, and then either buy or loot a Dharoks' greataxe, Torag's hammers, Guthan's spear or Verac's flail from the chest. The drop rate of the sigil starts at 1/75 and becomes 5% less for every brother killed, to a maximum rate of 1/50.
5. Once you have both a weapon and the sigil, click on the sigil with one of the above weapons in your inventory. Choose "Melee / defender" to get your Tier 70 Corrupted defender. This will consume the sigil and the weapon, but keep your Dragon defender.
2: Ancient Defender

This defender is arguably the hardest to get, requiring not only an item received from killing Nex, but also an untradeable item that takes 125 Trivia Points to get.
1. Gear up and head to Nex in the God Wars Dungeon. (Quest Tab > Bosses > God Wars Dungeon)
2. KEEP YOUR CORRUPTED DEFENDER EQUIPPED OR IN YOUR INVENTORY (You can't receive the upgrade piece without it!)
3. Kill Nex until you receive an Ancient emblem. The drop rate is a solid 1/60 and does not scale with your gamemode.
4. You're not done there, however. You need to acquire a Chaotic splint by participating in Trivia which pops up in the chatbox every 3-6 minutes.
5. Collect 125 Trivia Points and head over to the Wise Old Man who owns the Trivia store.
6. Buy a Chaotic splint from him, and then click on the emblem with your splint in your inventory.
7. Choose "Melee / defender" to get your Tier 80 Ancient defender. This will consume BOTH the splint and emblem, but you will still keep your previous defenders.
3: Kalphite Defender
The last step on your journey for the T90 Defender.
1. Gear up and head to the Kalphite King. (Quest Tab > Bosses > Kalphite King)
2. KEEP YOUR ANCIENT DEFENDER EQUIPPED OR IN YOUR INVENTORY (You can't receive the upgrade piece without it!)
3. Kill the Kalphite King until you receive Perfect chitin. The drop rate is a solid 1/65 and does not scale with your gamemode.
4. Simply click on the Perfect chitin with your Ancient defender in your inventory. This will consume ONLY the chitin. You'll still have your Ancient defender.
[This guide came from old forums - i did not write]-
2
-
-
 Order of The Ascension
I. Introduction to Legiones
Legiones, commonly known as Ascension Bosses. are a group of 6 Notoriously hard Bosses that are found in the Ascension dungeon. Which is located in oo'glog Monistary.
There is an ascension NPC which will create your ascension crossbow with 1 of each signet, and a Dragon-crossbow. Each individual Legione drops their own signet, which will be shown below.
II. Inventory & Gear Setup
From Left to right, this is a gear setup, as range is going to be the most effective way to kill legione, as the further you are away from them, the less damage they will do to you.

Helmet: Sirenic mask > Pernix cowl > Superior death lotus hood > Death lotus hood > Full Slayer Helmate > Armadyl helmet > Karil's coif
Neck: Amulet of souls > Farsight blood necklace > Farsight sniper necklace > Saradomin's murmur > Amulet of ranging > Amulet of fury
Body: Sirenic hauberk > Pernix body > Superior death lotus chestplate > Death lotus chestplate > Armadyl chestplate > Karil's top
Legs: Sirenic chaps > Pernix chaps > Death lotus chaps > Armadyl plateskirt > Karil's skirt
Gloves: Ascension grips > Pernix gloves > Swift gloves > Armadyl gloves
Boots: Pernix boots > Glaiven boots > Armadyl boots
Cape: Completionist Cape > TokHaar-Kal-Xil > Ava's alerter > Ava's accumulator > Any Skill cape > Legends Cape
Ring: Archers' ring (i) > Onyx ring (i) > Archer ring
Two-handed Weapon: Noxious longbow > Zaryte Bow > Royal Crossbow > Attuned Crystal Bow
Main-hand Weapon: Ascension crossbow > Chaotic crossbow > Armadyl crossbow > Rune Crossbow
Shield: Elysian spirit shield > Eagle-eye kiteshield > Armadyl buckler > Dragonfire shield (ranged)
Crossbow Ammo: Ascension bolts > Royal bolts > Diamond bolts (e) > Dragon Bolts (e) > Broad-tipped bolts
Aura: Vampyrism > Penance > Sharpshooter [of any Tier]
III. Map of Monastery of Ascension
iv. how to enter the chambers
In order to kill the Legio's, you will need to kill the npcs around the boss rooms to obtain keys or purchace from other players
Rorarius, Gladius, and Scutarius all drop these keys.-
5
-
-
Good to see you Adam.
-
Why Hello There.
The names Cyan. Or some beloved people who call me by birth name, Gregg.
Age of 21 with a love for Graphic Design, Long walks in the dark, and reading through 100's of lines of CSS to find that a Colon was used instead of a Semicolon.
My realm of Development is very minuscule. What i mean by that is the only thing i've accomplished is small things for Android Development Modding. But i do share interest in developing regardless of the case...so thats why i do Web Design..its far less of a headache.I'm a simple man, don't have exotic things, no luxury apart from not having to pay for my photoshop applications.
Thanks Billy for the assistIm a hands on learner, but even with two hands i end up picking it up and setting it down to do something else when i get sick of it. :pepehands:
But that is all about me thats generally necessary for a "intro" Don't need to post my E-Harmony Profile here so if any further questions or you just wish to chat. Heres the Mailbox. ill try to skim through it like i do with my real junk mail, but i'll get back to you at my earliest convenience.
Ataraxia Updates #3 - 14th September, 2018
in Ataraxia Archive
Posted
Its not the fact that i want to decide what goes in there all im saying is that there are the same items in both shops, but noted.
my 2 cents will only work when i have other platinum members input. therefore as stated above, a poll / questionnaire would've been a better approach before the stores were made