


Araxxi
-
Content Count
24 -
Joined
-
Last visited
Content Type
Profiles
Forums
Calendar
Posts posted by Araxxi
-
-
Glacors Guide

Glacors are fairly simple. They are commonly killed for slayer and reaper tasks, or for their rare drops: steadfast, ragefire and glaiven boots
Recommended requirements: 92+ Magic, 68+ Prayer, 90+ Defence, 90+ Constitution
Helm: Grim reaper hood > Tectonic mask > Anima core of Seren mask > Virtus mask > Ganodermic visor > Starter helm
Body: Tectonic robe top > Anima core of Seren body > Virtus body > Ganodermic poncho > Starter top
Legs: Tectonic robe legs > Anima core of Seren legs > Virtus legs > Ganodermic leggings > Starter bottoms
Hands: Deathouched bracelet > Celestial handwraps > Static gloves > Spellcaster gloves > Virtus gloves > Starter gloves
Feet: Hailfire boots > Ragefire boots > Boots of subjugation > Starter boots
Neck: Arcane blood necklace > Arcane stream necklace > Amulet of souls > Saradomin's hiss > Amulet of fury
Ring: Ring of wealth (c) > Ring of death > Seers' ring (i) > Seers' ring
1h weapons: Wand of the praesul > Seismic wand > Wand of the Cywir elders > Virtus wand
2h weapons: Staff of Sliske > Noxious staff > Superior Zuriel's staff > Obliteration > Camel staff> Staff of darkness > Chaotic staff > Attuned crystal staff > Polypore staff
Shield/off-hand: Imperium core > Kalphite rebounder > Seismic singularity > Divine spirit shield > Orb of the Cywir elders > Virtus book
Cape: Completionist cape (t) > Completionist cape > Enhanced fire cape > Tokhaar-kal Mej > Fire cape
Aura: Any level of Vampyrism or Runic accuracy
Getting there;;train > Glacor Cave
Strategy: Protection prayer: Deflect/Protect MisslesFood/Potions: Overloads, Super restores and Saradomin brew flasks
Spell: Blood Barrage or Fire Surge
It is HIGHLY recommended that you bonfire before this task.
The kill:
Begin by attacking a glacor. Once the glacor reaches about half health it will spawn 3 glacytes (unstable, enduring and sapping). Each glacyte has a different ability, and whichever glacyte you kill last will pass its ability onto the bigger glacor. Sapping glacyte leeches your prayer. It is in your best interest to kill the sapping glacyte first. Enduring glacyte reduces the amount of damage you deal to him, making him the most difficult to kill; you'll be killing him second. Unstable glacyte randomly erupts on itself, making it super easy to kill first, however, it is in your best interest to save him for last. Failure to kill them in the proper order will result in longer kills.
Proper order to kill glacytes: Sapping > Enduring > UnstableOriginal author: @E36 / 302
-
God Wars Dungeon 2 Guide
Getting There:
To teleport to God Wars Dungeon 2:Quest tab > Bosses > Last page of bosses > The Heart
Map of The Heart for reference

The Camps

Once you arrive in the entrance area you will notice a large tree to the North, outside of which Soothsayer Sibil stands as an NPC used for battling and interacting with Telos (for a guide on Telos refer to #telos). You will also notice the 4 Chosen of each of the warring gods, standing next to their allocated banners.
Furies' Chosen
Vindicta's Chosen
Gregorovic's Chosen
Helwyr's Chosen
From each of the bosses you will receive seals. You will use those seals on these NPCs to gain reputation in opposing factions. Each seal awards 5 reputation.
I highly recommend you start with Twin Furies since they're the easiest of the GWD2 bosses. After Twin Furies I would suggest going to Gregorovic, the second easiest GWD2 boss. Alternate between the two bosses until you have 5,000 reputation in both factions, which will increase your drop rate to 100% for maximum rare drops. After this you can easily camp at either boss to farm GWD items for chime while collecting seals to earn the other factions reputation.
Reputation Rewards
100 25% Drop chance increase
1,000 50% Drop chance increase
2,000 Armour upgrading
3,500 75% Drop chance increase from
4,500 50% Reduction in required kill count
5,000 100% Drop chance increase
These rewards are specific to each faction, so if you have a 100% rate through Helwyr's Chosen, for example, you would have a 100% drop rate increase at Helwyr only.
Helwyr

Location
Located in the South East corner of The Heart lies Seren's Encampment. Here you will find the entrance to fight Helwyr, her general. It requires level 80 Magic to enter and contains a portal to the boss arena. Unlike the original God Wars Dungeon, all instances do not cost any Coins. This means you are able to start and rejoin free for up to an hour once you have "paid" the initial hour's worth of followers.. He has a regular attack pattern which contains a few special attacks.
Strategy
Prayer: Protect from Melee
Food/Pots: Overloads, Renewals, Super Antipoison, Super Restores and Saradomin Brews.Equipment: Helwyr is weak against stab. High tier melee gear is recommended. Amulet of souls is very effective here. Highest tier of berserker aura, or vampyrism aura you can purchase is very helpful. The boss can be easily defeated in T80+ armour, or Superior elite void.
Combat: Combat with Helwyr is very straight forward. Simply avoid the spores from the mushroom attack when it appears, and when he stands on his hind legs run through him to avoid his bleed effect.
Helwyr's Attacks (in order of occurrence)Mushroom Growth - Helwyr makes three random mushrooms grow. These then give off a green gas that damages players standing in it. The gas also forces the player to walk instead of run.Cleave - Helwyr stands on his rear legs and slashes in front of him. If a player is caught in the cone area in front of him they will be hit and will suffer a bleed effect. run through Helwyr to avoid this attack.
Frenzy - Helwyr jumps to a player and starts spinning around clawing at the nearby area. This deals high damage and will also start a bleed effect.
Howl - Helwyr howls and summons two Cywir Alphas to attack the player.
Twin Furies
Location:
Located in the North West corner of The Heart lies Zamorak's Rampart. Here you will find the entrance to fight The Twin Furies - Avaryss and Nymora - his generals. It requires level 80 Ranged to enter and contains a portal to the boss arena. Unlike the original God Wars Dungeon, all instances do not cost any Coins. This means you are able to start and rejoin free for up to an hour once you have "paid" the initial hour's worth of followers. The Twin Furies may be two NPCs, but they share the same hitpoints. They have a repetitive attack pattern which contains a few special attacks.
Strategy
Prayer: SoulsplitFood/Pots: Overloads, Renewals, Super Restores and Saradomin Brews.
Equipment: High tier melee gear is recommended. Amulet of souls is very effective here. Highest tier of berserker aura, or vampyrism aura you can purchase is very helpful. The boss can be easily defeated in T80+ armour, or Superior elite void.
Combat: Combat with Twin Furies is as follows: focus on Nymora during Avaryss' wall charge. When Avaryss stops flying begin attacking him. Focus on Avaryss until the end of the channeled bomb phase. Repeat until you you've defeated them.Twin Furies Attacks (in order of occurrence)Wall Charge - Avaryss jumps onto the walls and flies off in a straight line. If players are hit, they are knocked back and damage is dealt. He will fly a total of 4 times.Ceiling Collapse - Nymora flies up into the ceiling and knocks down stalactites dealing damage everywhere across the arena except a 3X3 area beneath her. During this phase you will focus on Avaryss.
Channeled Bomb - Avaryss and Nymora fly to the center of the room and begin to charge their attack while a ring of fire surrounds the outer edges of the arena, damaging any players that stand within it. The sisters channel their powers in order to create an energy portal that shoots fire bolts that damage players. A blue bar above their heads will slowly fill up, when it fills the portal will explode and deal damage to all players within radius. During this phase damage is increased on both Avaryss and Nymora.
Vindicta and Gorvek

Location
Located in the South West corner of The Heart lies Zaros's Bastion. Here you will find the entrance to fight Vindicta, his general. It requires level 80 Attack to enter and contains a portal to the boss arena. Unlike the original God Wars Dungeon, all instances do not cost any Coins. This means you are able to start and rejoin free for up to an hour once you have "paid" the initial hour's worth of followers. She has a repetitive attack pattern which contains a few special attacks.
Strategy
Prayer: Protect from Melee, or you can use Soulsplit in T90+ gear with an Amulet of souls
Food/Pots: Overloads, Renewals, Super Restores and Saradomin Brews.
Equipment: High tier ranged gear is recommended with dragonbane bolts. Amulet of souls is very effective here if you are using Soulsplit. Highest tier of vampyrism aura you can purchase is very helpful.
Combat: Combat with Vindicta & Gorvek is as follows: Simply attack Vindicta and beware of when she flies up. When she flies up be prepared to dodge a a wall of dragonfire. Repeat until you've defeated them Vindicta & Gorvek's Attacks
Hurricane - Vindicta spins on the spot dealing damage to all surrounding targets.Dragonfire - Vindicta uses her dragon, Gorvek, to breathe a wall of fire onto the ground. Standing in this fire deals a large amount of damage.
Gregorovic

Location
Located in the North East corner of The Heart lies Sliske's Necropolis. Here you will find the entrance to fight Gregorovic, his general. It requires level 80 Prayer to enter and contains a portal to the boss arena. Unlike the original God Wars Dungeon, all instances do not cost any Coins. This means you are able to start and rejoin free for up to an hour once you have "paid" the initial hour's worth of followers. He has a repetitive attack pattern which contains a few special attacks.
Strategy
Prayer: Protect from RangeFood/Pots: Overloads, Renewals, Super Antipoison, Super Restores and Saradomin Brews. Equipment: High tier ranged gear is recommended. Farsight blood necklace is very effective here. Highest tier of vampyrism aura you can purchase is very helpful.
Combat: Combat with Gregorovic is as follows: Simply attack Gregorovic from afar with range. When you see shadows appear on the ground, run to a tile that is safe to avoid his Glaive throw Gregorovic's Attacks Trick Knife - Gregorovic throws a knife that will bounce between players.
Summon Spirit - Gregorovic summons a spirt of rage, delirium, or mania (depending on where he stands when he summons it). If they reach Sliske, they will empower him in a different manor depending on which spirit was summoned. They can increase his attack damage, poison damage, or attack speed respectively.
Glaive Throw - Gregorovic throws his glaive into the air and shadows will appear on the arena floor. Daggers and knives will then fall and damage players standing under the shadows.
Summon Shadow - He summons 2 or 3 shadows. Gregorovic is able to swap places with any of these shadows at one time.
Author: @E36 / 302
-
Kalphite King Guide

Strategy:Kalphite King is a very straight forward boss. You can use any combat style on him, however I personally find range to be the best option due to accuracy VS magic, and you don't get frozen like you do in melee. It is also recommended that you bring a T80 defender/repriser/rebounder for a chance at a perfect chitin drop, which is the item to upgrade your T80 defender into the T90 Kalphite defender.
Kalphite King continually changes forms throughout the fight. You will need to pay close attention to his color so you know what to pray.It is HIGHLY recommended that you bring a steel titan. This will help you take the minions out fairly quickly. The best vampyrism aura you have would also be helpful. A blood necklace (whichever one matches your combat style) is very effective here due to the amount of minion spawns.
Remember to bonfire before attempting Kalphite King.
What to Pray: He will change between three colors. What you pray for each color is as follows:
Blue = Protect from Magic
Yellow = Protect from Melee
Green = Protect from Range
Digging: Occasionally Kalphite King will dig underground. You need to run away when you see his shadow appear underneath you. When he does his dig attack it is a very good time to wipe out any remaining minions that may be alive.
Heal: Occasionally Kalphite King will have a green or red aura around him. This indicates that he is attempting to siphon damage dealt in order to heal himself. This mechanic is fairly hard to avoid, so don't worry if you accidentally heal him a couple of times.
Minions: Kalphite King spawns minions twice during your fight. He first summons them at around 17,000 hitpoints, and the second times is around 7,000 hitpoints. When they are spawned you need to ignore Kalphite King's color and protect from Magic. It is up to you if you want to kill the minions to save yourself some food, or if you want to ignore them for maximum damage on Kalphite King.
Magic Phase

When Kalphite King is blue you will need to use Protect from Magic. He will occasionally throw orbs at you, and around you. Move away from these as fast as possible to avoid taking a lot of damage.During the melee and magic phases Kalphite King uses a charge attack. He will pause for a moment, then charge straight towards you dealing lots of damage. Simply move out of the way to avoid this attack If he charges you while near a wall he will hit you even higher, and the damage with be typeless.
Melee Phase

As stated above under Magic Phase, you need to look out for his charge attack. When he pauses to charge you, simply move out of the way to avoid the attack.
He will occasionally use a swiping attack that will deal 200-400 damage.
Range Phase

During the range phase he will spit a green colored acidic goo at you that will stun you. This is unavoidable, and will damage you for 50% of your total hitpoints
Summary: This guide may make Kalphite King seem a little difficult, but honestly he isn't too bad, and quite a few mess ups are tolerable when fighting Kalphite King. Just be sure to continually attack him, and dodge when necessary and you should be fine. Don't forget to change your prayers when necessary!When he digs, you dodge.
When orbs/spheres appear around you, run away from them.
When he has an aura around him he is trying to heal.
When he is digging and there are minions out, attack the minions.
When he pauses for a moment in magic/melee phases he is about to charge, and will deal more damage if you're against the wall.
When he is in his range phase he will shoot a green acidic goo at you. This is unavoidable and deals 50% damage.
When he turns blue use Protect from Magic.
When he turns yellow use Protect from Melee.
When he turns green use Protect from Range.
That's it! Hopefully this guide helps you earn your way towards your 3 T90 defenders, and some awesome drygore drops!
Author: @E36 / 302-
.png) 1
1
-
-
Group Ironman is a game mode similar to Ironman mode where you have a group of up to 4 members in total. You can do things such as co-op slayer, bossing, trading, etc. with any players in your group.
https://i.imgur.com/wnlk06p.png
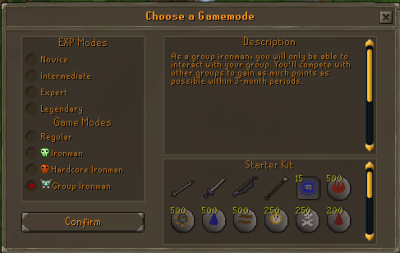
The game mode runs in 'seasons' that last 3 months. Your group XP, levels, boss points, and deaths during the 3-month period make up your score. At the end of each season a reward will be given to the first place team, and a new season starts right away. Player data is NEVER reset.You can find a full breakdown of how score is calculated at #gim-score-info https://i.imgur.com/Q9rUALW.png
There are lots of useful tools at your disposal that you can use to get ahead and/or gain insight into the current season. These include the: #gim-news Discord channel
https://i.imgur.com/t8UTj9i.png

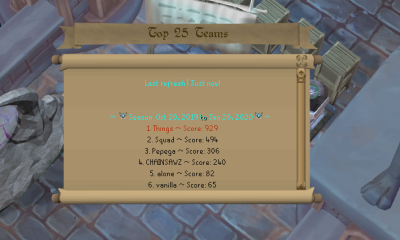
Where you can - See who the last season champion was, and who's currently in the lead
- See when special events are active
- See weekly recaps of GIM highlightsRemember to do ;;registergim on #bots so you will be tagged in important updates.(edited)
GIM Leaderboardhttps://i.imgur.com/VWZvAsk.png
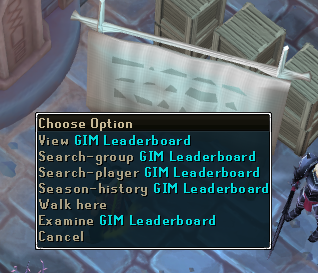
Where you can - View the top-25 groups
- Search groups and players
- View previous GIM winners
GIM Guidehttps://i.imgur.com/CCxXIJu.png
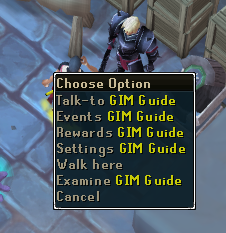
Where you can - Learn more about GIM
- See your group's stats
- See all active events
- Claim rewards from being the season champion, or winning events
- Rename your group
- Kick a group member
- Change the group leader
- Add new group members
GIM bank chest https://i.imgur.com/zlnYEkR.png
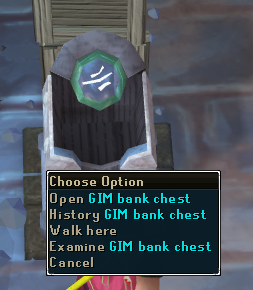
Where you can
- Access a shared bank to be used by you and your group members (similar to clan banks)
- See a log of recent withdraws and deposits made by your group membersCreated by: Playboi lare sxc dev
-

Introduction:
Firemaking is a skill used to burn logs .
Firemaking will allow you to level your Cooking skill! In this guide, you will learn which logs to burn at your current level and ways to speed up your Firemaking experience gain.
Things to Know Before Starting: You can make leveling up Firemaking a lot faster in a few different ways. One way you can increase the amount of experience you're gaining is by completing the random encounters. You can do that by making sure the random events are turned on in your ;;settings and completing Firemaking actions. The items are awarded roughly every 1,000 Firemaking actions and gives three unique items. The 3 unique items are the Ring of Fire, Flame Gloves, and the Inferno Adze. Here's what each item does:
Ring of Fire - 2% bonus experience during Firemaking (5% when paired with Flame Gloves).
Flame Gloves - 2% bonus experience during Firemaking (5% when paired with Ring of Fire).
Inferno Adze - can be used as a dragon hatchet or a rune pickaxe and has a chance to instantly burn logs while woodcutting.Another good item to have is the wisdom aura which will help you in every skill.
Portable Braziers are a great tool that will give you bonus experience and a chance to save resources while training. You can get them through SoF or other players putting them down. 1 Portable Brazier lasts 5 minutes, multiple Portable Braziers can be put down at once to increase the time.Voting books are a great source of bonus experience as well. Make sure you vote every day to get them and to get extras during vote parties!


There is a perk for Firemaking that gives you more fire spirit visits while burning logs. The perk also increases your health boost from stoking bonfires (adding logs to them) to 200% and increases you experience gained by 15% while adding logs to a fire.How to Get Started:The first step to getting the resources you need is by gathering logs. You can either buy logs from players or check out our Woodcutting guide for more information on gathering.
As there is a permanent fire at ;;home you'll never have to leave this location. Simply use your logs on the fire to add to the preexisting fire in front of the bank chest. It is important to note that with a Portable Brazier you have a 10% chance to save a log while burning them, though this is not necessary for this skill it will leave you with a larger stack of logs when moving on to Fletching. Logs Suggested per Level:These logs are suggested for each listed level regardless as to whether you have experience boost or not. This is a basic list and does not include every log imaginable.Logs

level 1 - 15 Oak Logs

Level: 15 - 30 Willow Logs
Level: 30 - 45 Maple Logs
Level: 45 - 60 Yew Logs
Level: 60 - 75 Magic Logs
Level 75 - 99 Elder Logs
Conclusion:
Congratulations on achieving level 99 Firemaking! This brings you one step closer to maxing your account!
Original Author: @Kirito. -

Introduction:Fletching is a skill used to make ranged weaponry as well as ammo. Fletching will allow you to get a head start on early stage PVM and make some coin! In this guide, you will learn what to make at your current Fletching level.
Things to Know Before Starting:
You can make leveling up Fletching a lot faster in a few different ways. One way you can increase the amount of experience you're gaining is by completing the skilling outfit. You can do that by making sure the random events are turned on in your ;;settings and completing Fletching actions. The pieces of the set are awarded roughly every 1,000 Fletching actions.Another good item to have is the wisdom aura which will help you in every skill.
Portable Fletchers are a great tool that will give you bonus experience and a chance to save resources while training. You can get them through SoF or other players putting them down. 1 Portable Fletcher lasts 5 minutes, multiple Portable Fletcher can be put down at once to increase the time.
Voting books are a great source of bonus experience as well. Make sure you vote every day to get them and to get extras during vote parties!


There is a perk for the Fletching skill. The perk gives you the ability string bows without bowstring as well as not having to use feathers on unfinished ammo. The perk also grants a speed boost of X2.How to Get Started:To begin your Fletching journey, you need to first gather the resources needed to train the skill itself. You will need a lot of logs, see the Woodcutting Guide or buy them from players. Even without a Portable Fletcher, you can be anywhere on the server to complete this skill.We will now go over what you can make and the level range required for each item. Please note, this guide was written based on the logs you would receive from the Woodcutting guide. There are other logs in this game that can yield more experience than the ones listed, most of which require being a donator or have luck on the Sof/LMS event.***All sell prices listed are based on general store sell prices and are not an actual reflection of the items worth to other players***
***It is important to note that it's not recommended to make stocks for experience as it requires more work to get the max experience out of the item and it usually gives less experience overall***
Regular Logs

Arrow Shaft

Level: 1 - 5
Sell Price: 12 Gp (X15)
Shortbow

Level: 5 - 9
Sell Price (Strung): 1,000 Gp
Sell Price (Unstrung): 500 Gp
Wooden Stock

Level: 9 - 10
Sell Price: 20 GpShieldbow

Level: 10 - 20
Sell Price (Strung): 2,000 Gp
Sell Price (Unstrung): 1,000 Gp
Oak Logs

Oak Shortbow

Level: 20 - 24
Sell Price (Strung): 2,500 Gp
Sell Price (Unstrung): 1,250 GpOak Stock

Level: 24 - 25
Sell Price: 27 Gp
Oak Shieldbow

Level: 25 - 35
Sell Price (Strung): 3,000 Gp
Sell Price (Unstrung): 1,500 GpWillow Logs

Willow Shortbow

Level: 35 - 39
Sell Price (Strung): 3,000 Gp
Sell Price (Unstrung): 1,500 Gp
Willow Stock

Level: 39 - 40
Sell Price: 53 Gp
Willow Shieldbow

Level: 40 - 50
Sell Price (Strung): 3,500 Gp
Sell Price (Unstrung): 1,750 Gp
Maple Logs

Maple Shortbow

Level: 50 - 54
Sell Price (Strung): 5,000 Gp
Sell Price (Unstrung): 3,000 Gp
Maple Stock

Level: 54- 55
Sell Price: 100 Gp
Maple Shieldbow

Level: 55 - 65
Sell Price (Strung): 6,000 Gp
Sell Price (Unstrung): 4,000 GpYew Logs

Yew Shortbow

Level: 65 - 69
Sell Price (Strung): 8,000 Gp
Sell Price (Unstrung): 6,000 Gp
Yew Stock

Level: 69 - 70
Sell Price: 167 Gp
Yew Shieldbow

Level: 70 - 80
Sell Price (Strung): 10,000 Gp
Sell Price (Unstrung): 7.000 GpMagic Logs

Magic Shortbow

Level: 80 - 84
Sell Price (Strung): 15,000 Gp
Sell Price (Unstrung): 10,000 GpMagic Stock

Level: 84- 85
Sell Price: 500 Gp
Magic Shieldbow

Level: 85 - 90/99
Sell Price (Strung): 20,000 Gp
Sell Price (Unstrung): 15,000 Gp-If you chose not to cut Elder Logs, cut these until 99. If you did cut Elder Logs, move on to the next item.
Elder Logs

Elder Shortbow

Level: 90 - 95
Sell Price (Strung): 28,000 Gp
Sell Price (Unstrung): 20,000 Gp
Elder Shieldbow

Level: 95 - 99
Sell Price (Strung): 36,000 Gp
Sell Price (Unstrung): 22,400 GpConclusion:Congratulations on achieving level 99 Fletching! This brings you one step closer to maxing your account and should have given you a decent chunk of gold to play with!
Original Author: @Kirito.
-

Introduction:
Prayer is a skill used for almost every PVM action you can take. Prayer will allow you to take down bosses like Kalphite King and Corp with ease!Things to Know Before Starting:
You can make leveling up Prayer a lot faster in a few different ways. One way you can increase the amount of experience you're gaining is by completing the skilling outfit. You can do that by making sure the random events are turned on in your ;;settings and completing Prayer actions. The pieces of the set are awarded roughly every 1,000 Prayer actions. You will also receive an add-on piece at 25,000 actions. Another good item to have is the wisdom aura which will help you in every skill.
Voting books are a great source of bonus experience as well. Make sure you vote every day to get them and to get extras during vote parties!
(edited)


There is a perk for Prayer that decreases your prayer points 25% slower. The perk also increases your experience gain by 25%!
How to Get Started:The first step to getting the resources you need is by gathering bones or ashes. You can either buy bones and ashes from players or get them by killing various monsters. Slayer is usually a good skill to train your prayer as you'll be killing monsters anyway.

There is an altar you can use your prayer items on at ;;home to gain additional experience! The Altar is located just West of the home teleport location.

You can use any type of prayer related bones or ashes on the altar to gain experience. Listed below are the most popular types of bones and ashes that players use and sell.Types of Bones:

Dragon Bones

Frost Dragon Bones

Reinforced Dragon Bones

Infernal Ashes

Searing Ashes

Conclusion:
Congratulations on achieving level 99 Prayer! This brings you one step closer to maxing your account and will make PVM 100% more easy for you!
Guide Author: @Kirito
Advisor: @hard benny -

Introduction:
Woodcutting is a skill used to gain logs from various trees . Woodcutting will allow you to level your firemaking and fletching skills! In this guide, you will learn how to reach each tree location location, as well as the trees to cut at your current level.Things to Know Before Starting:
You can make leveling up Woodcutting a lot faster in a few different ways. One way you can increase the amount of experience you're gaining is by completing the skilling outfit. You get that by making sure the random events are turned on in your ;;settings and completing Woodcutting actions. The outfit is awarded roughly every 1,000 Woodcutting actions and gives 1% experience boost for each piece. There are 4 pieces to this skilling outfit.Another good item to have is the wisdom aura which will help you in every skill.
Voting books are a great source of bonus experience as well. Make sure you vote every day to get them and to get extras during vote parties!

There is a perk for Woodcutting thatgives you a 33% chance to cut 2 logs instead of one.The perk also sends all of your bird nests straight to your bank for you so there's no inventory clutter!How to Get Started:
The first step to getting the tools you need is by typing ;;home and walking up the stairs. You'll run into an NPC named Bob. If you trade him you'll see all the tools you need for your woodcutting journey
For any future hatchets you will either need to make them, buy them, or get them through a monster drop. The dragon hatchet can be obtained by killing dagannoths and can later be made into a crystal hatchet. To make a crystal hatched, you will need access to ;;priff or ;;pz. at either of those locations you can start gaining 4,000 harmonic dust. once you've gained the require amount of dust, talk to Lady Ithell who will then fuse the dust to your dragon hatchet making it a crystal hatchet. Tree Suggestions and Locations:To begin woodcutting, go to your quest tab and click on the skilling button. From there chose the "woodcutting" option and click on "Seer's Village".Skilling>Woodcutting>Seer's VillageTree

Level: 1-15Location

Oak Tree

Level: 15-30/45-You can cut oak trees until you reach level 45 or you can move on to the next best tree right away. It depends on your game mode as to whether the next location is worth it to you.
Location:

Willow Tree

Level: 30-45 Location:

Maple Tree

Level: 45-60 Location:

Yew Tree

Level: 60-75 Location

Magic Tree

Level: 75-90/99-you can cut these trees all the way to 99 or you can move onto the next best tree. It depends how fast you want to level firemaking and fletching as to whether or not cutting the next tree is worth it to you. The next tree is not AFK at all and requires focus and time.
Location

Elder Tree

Level: 90-99 -There may be more Elder Tree locations that the ones listed below, but these three will give you a good idea of how long these trees take to cut/respawn. Location 1:This location is South of the Seer's bank.
Location 2:This location is East of the Varrock Loadstone.
Location 3:This location is South of the Drynore bank.
Conclusion:
Congratulations on achieving level 99 Woodcutting! This will allow you to begin, and hopefully finish, both firemaking and fletching. Good luck on the rest of your skills!Original Guide Author: @Galaxy.
Revised by @Kirito.


Ataraxia Updates #37 - 19th December 2019
in Ataraxia Archive
Posted
Good job! ❤️